Program Picker Manual
(This help file refers to the use of your keyboard to access commands/options within Program Picker, but all commands/options can also be accessed by clicking the required on screen tile with your mouse.)
Program Picker is an alternative to the Windows task switcher. Program picker offers program task switching as well as several other useful functions:
- 1) Launcher Mode: launch programs from Program Picker by pressing two consecutive keys. Switch to programs by pressing the same consecutive keys. 200 pages of 40 tiles - 8,000 programs and files can be pinned to tiles.
- 2) Quick Snap: resize program windows to fit into halves, thirds, quarters, sixths or eighths of the screen.
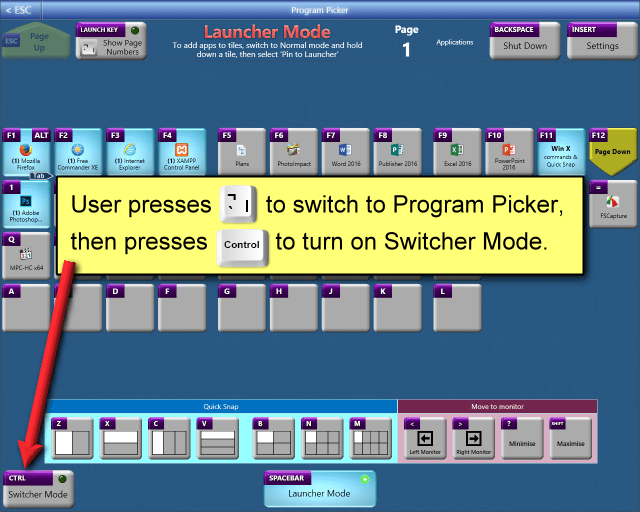
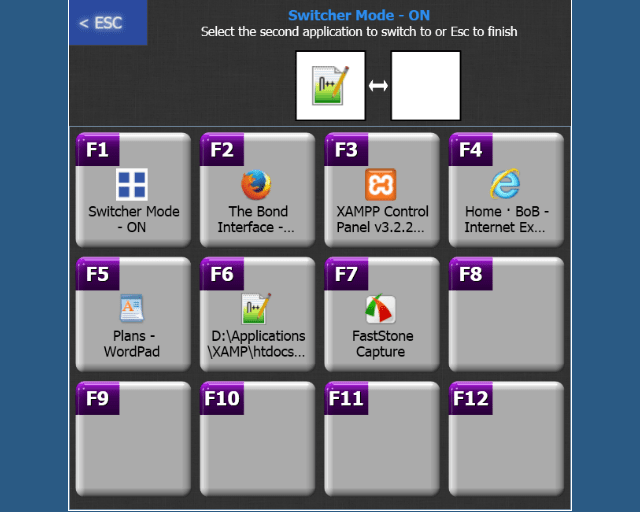
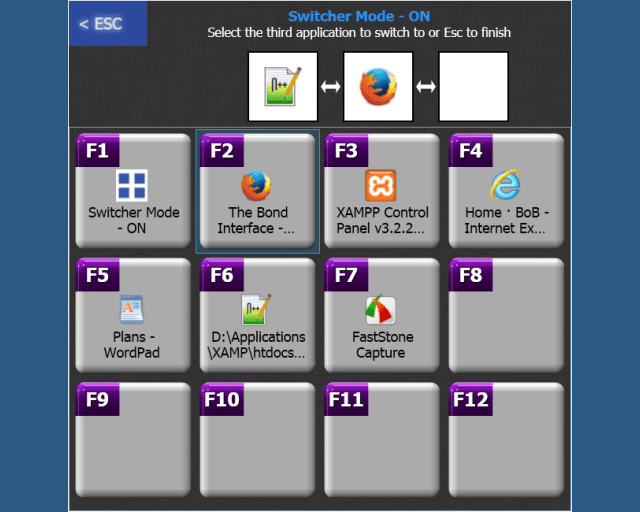
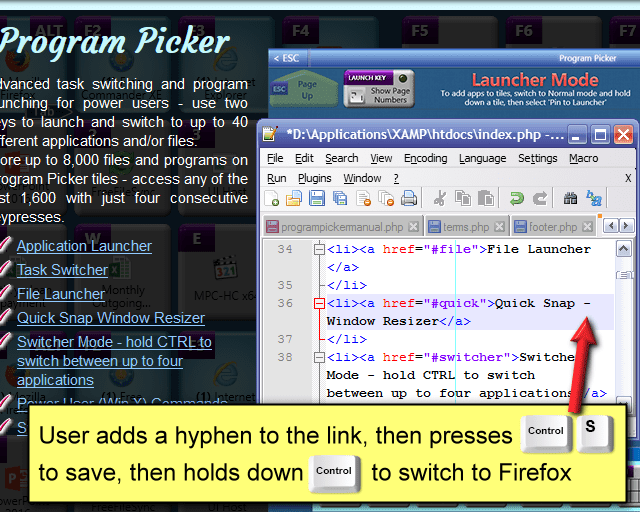
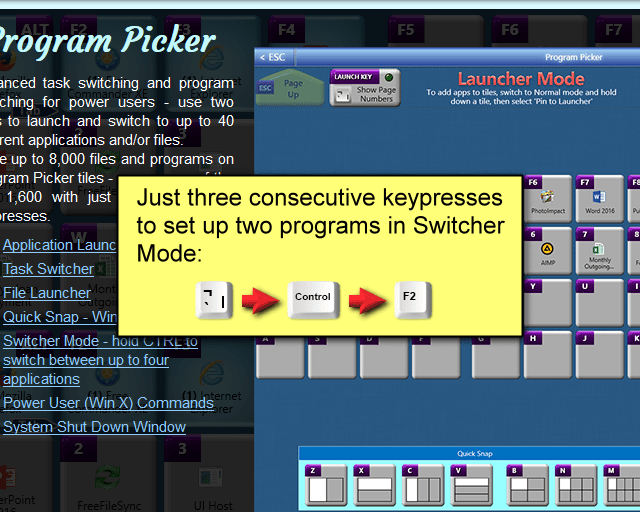
- 3) Switcher Mode: switch between two or more programs by just holding down the CTRL key on your keyboard.
- 4) Power user commands. Access Task Manager, Command Prompt, etc. using three consecutive keys.
- 5) Easy Shutdown - shutdown, restart, switch user, etc. by pressing Backspace (from within Program Picker) and a function key.
Installation
To install Program Picker, download the Program Picker 90 day demo here, unzip the file, then double click on the unzipped .msi file to install it.
By default, Program Picker runs automatically on startup, and requires Administrator rights (otherwise some programs may take priority over the keyboard shortcuts and you won't be able to switch to Program Picker using single launch keys.) (Alt-Tab will still work.)
Licence Activation
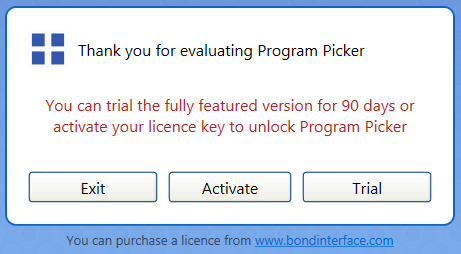
Each time Program Picker starts it will display a popup evaluation window, until you enter the licence code. Press the 'Activate' button in the activation window and then enter your licence code, to register Program Picker.
How to bypass UAC on Windows Startup
Every time you start Windows, Program Picker will autorun on startup, but the UAC window will appear and ask you to confirm that Program Picker can run. To bypass this, please follow the instructions in the video below - this works in Windows 10 and Windows 8.1 (I haven't tested it in Windows 11 yet, but I imagine it will be the same.)
How to switch to Program Picker
To access Program Picker, you can use six different methods:
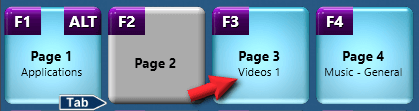
- 1) Hold down Alt and then press Tab, then let go of both keys. (Unlike the Windows task switcher, you don't have to keep holding down Alt or Tab once the Program Picker window has appeared, it will stay open until you press a keyboard key to select an option, or until you press Esc to close it and return to the previous program.)
- 2) Press the
 key - for U.K. keyboards (to the left of the '1' key)
- 3) Press the
 key - for U.S. keyboards (to the left of the '1' key)
- 4) Press the
 key
key
- 5) Press the
 key
key
- 6) Press the
 key
key
- 7) Press the
 key
key
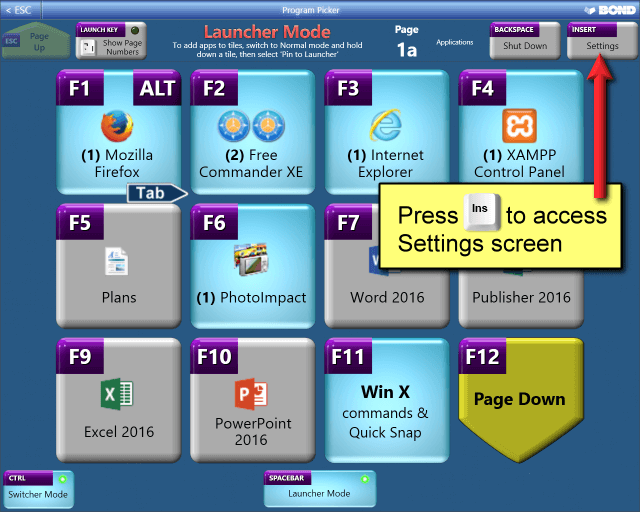
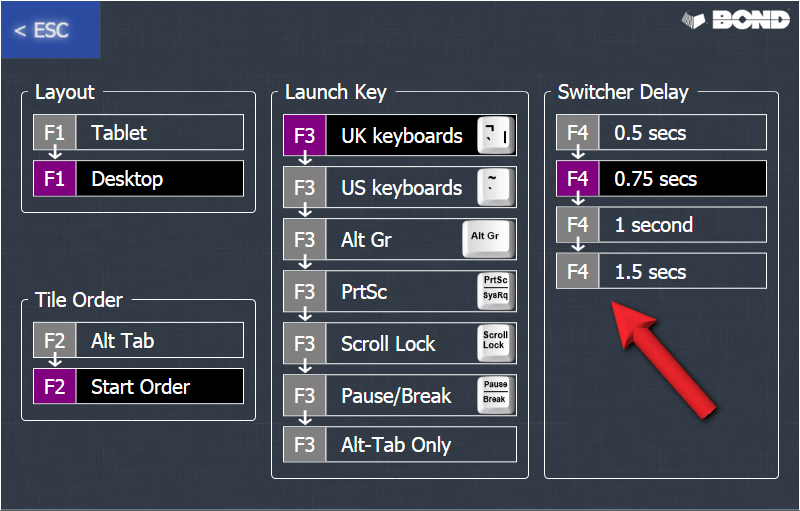
To change the launch key, enter Program Picker and press the Insert key to view the settings page, then press the F3 Multi-Toggle Button until the launch key you want to use is selected, then press Esc twice to return to the previous program:

Display Modes
Program Picker has two display modes:
1) Tablet mode
Designed for small touchscreens, Tablet Mode has a grid of three rows of four tiles, representing the twelve function keys. An Esc, Backspace and Insert tile are also visible near the top of Program Picker. Use your touchscreen to press the tile of the program you want to switch to, or press the 'Shut Down' tile to display the shut down option tiles, or press the 'Settings' tile to access the Program Picker settings window. You can also use your keyboard (if you have one attached to your tablet).
To access Program Picker on a touchscreen, press the Program Picker taskbar tile, as shown below: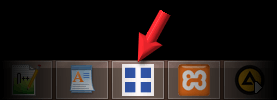
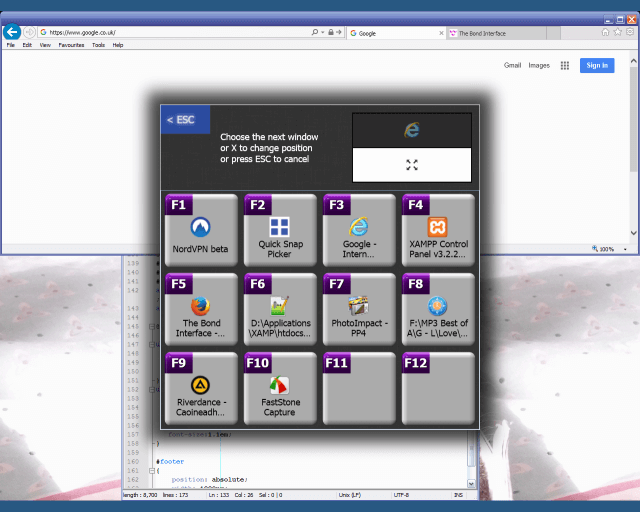
To view the Win-X (Power User) commands, press the F11 tile. You will see the window shown below - press the tile of the command you wish to run.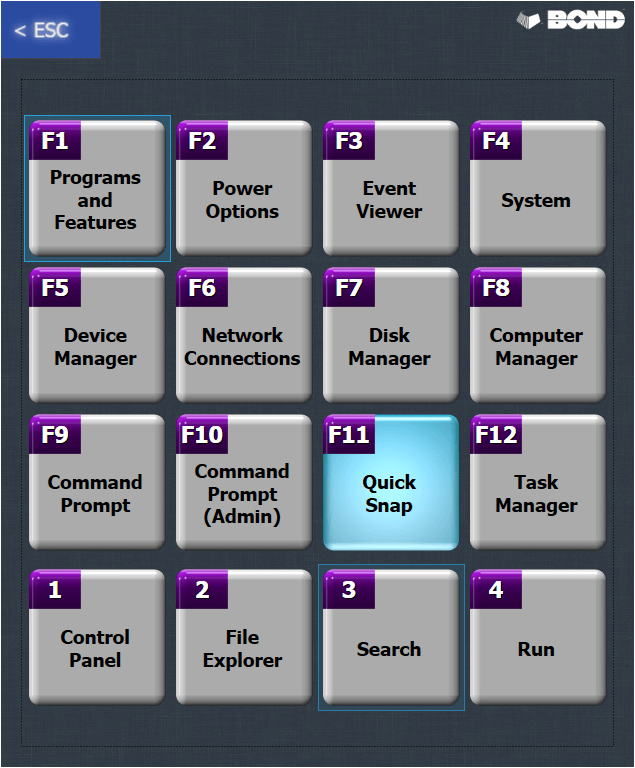
To view the Quick Snap window, press the F11 tile twice. You will see the window shown below - press the tile of the Quick Snap option that you wish to use. Quick Snap is explained in more detail below.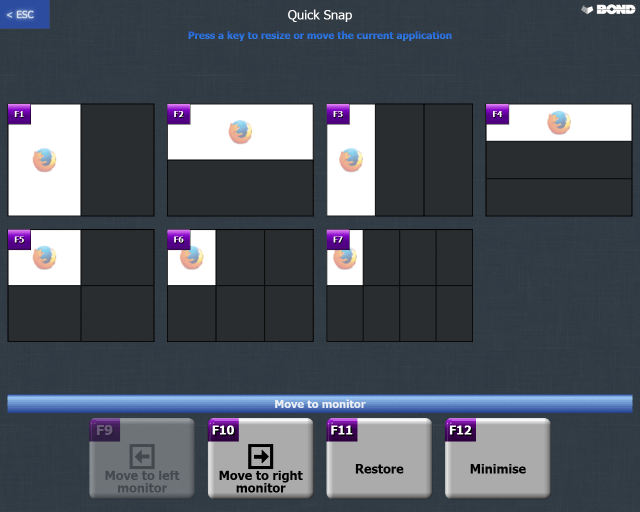
To change from Tablet Mode to Desktop Mode, press the 'Insert' 'Settings' onscreen tile, or the Insert key ![]() , as shown below:
, as shown below:
Press the F1 Multi-Toggle Button to toggle between Tablet Mode and Advanced Mode, then press Esc.
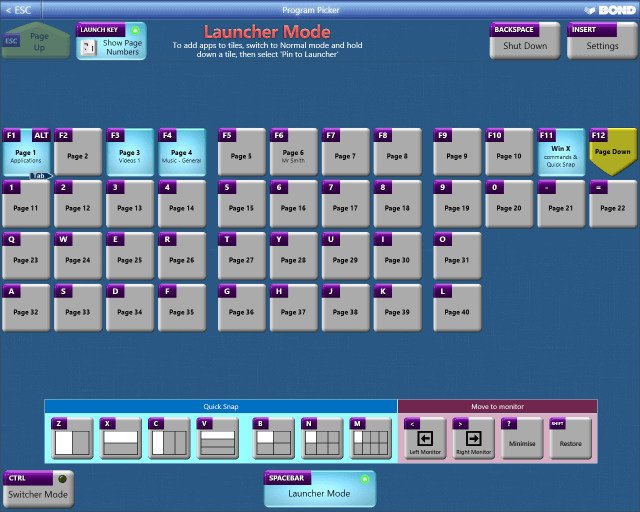
2) Desktop Mode
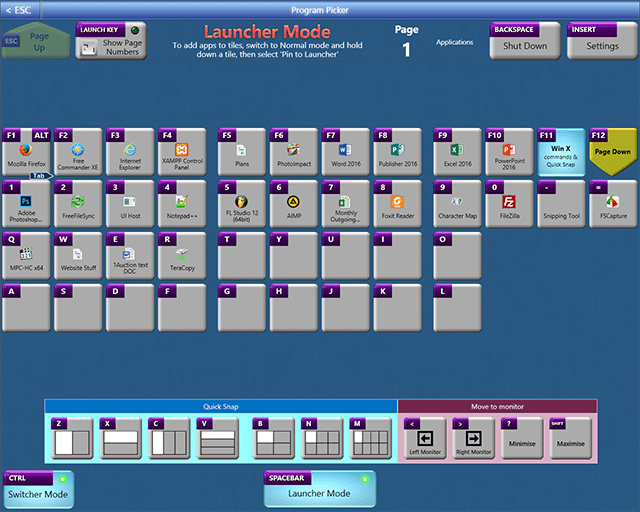
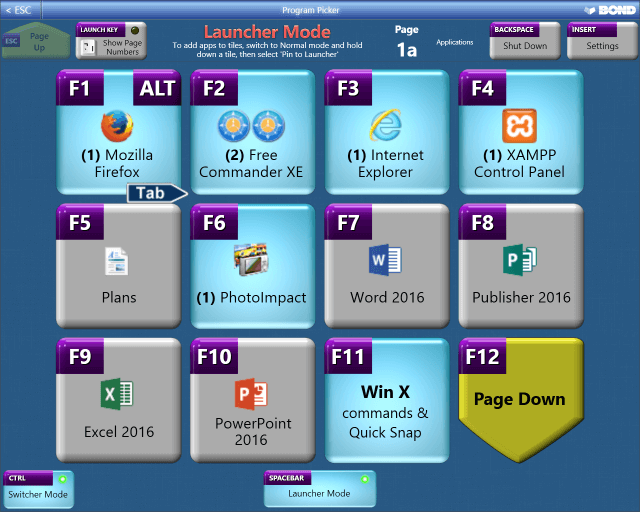
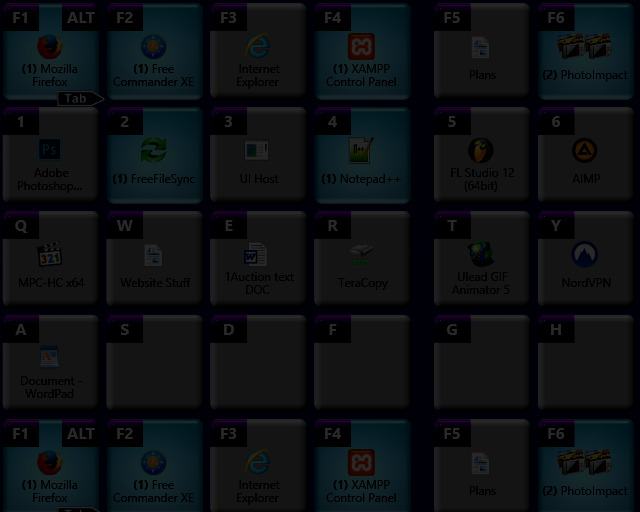
Designed for desktop computers with mouse and keyboard, and multiple monitors, Desktop Mode has a grid of four rows of tiles, mapped to the first four rows of your keyboard. This allows you to access forty programs or files from any program with just two keypresses. The bottom row (ZXCVBNM) is used for Quick Snap layouts, and 'Move between monitors' commands.
The two display modes, Desktop Mode and Tablet Mode, have two submodes - Launcher Mode and Normal Mode. Launcher Mode is used for launching programs and files, and switching to open programs. Normal Mode is used for switching to open programs (but not for launching them), and to select programs to pin to Launcher Mode. Usually Launcher Mode is used for all Program Picker operations, but Normal Mode can be used to switch to running programs that haven't been pinned to Launcher Mode.
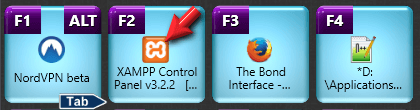
When you first use Program Picker, the Launcher Mode tiles will be empty. Press the Spacebar to change to Normal Mode. Here you will see all the currently running programs on your PC. From this screen you can select programs to pin to tiles on the Launcher Mode page.
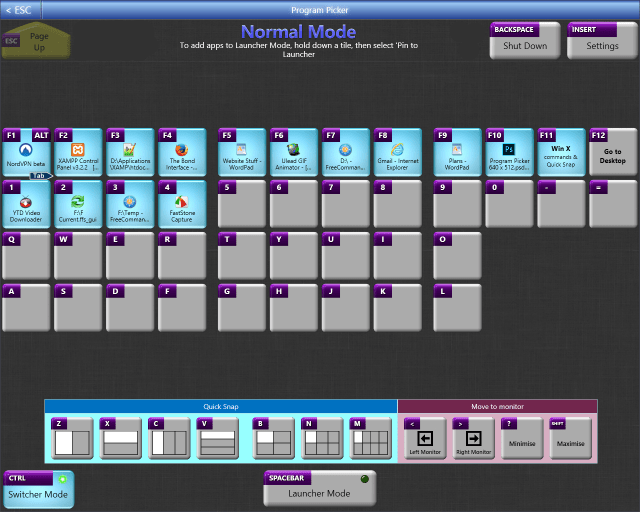
You can switch to programs using the Normal Mode screen by just pressing the key of the program you want. In the example below, you would press F2 to switch to XAMPP.
Alternatively, for Alt-Tab users: press Alt Tab and then let go - Program Picker will stay open. Press Tab to move across the tiles, then press Alt to select the current tile.
Normal Mode tile order:
- 1) Task Switcher mode
- 2) Start Order mode
To change the display mode; switch to Program Picker and press 'Insert' to view the Settings window, then press F2 to change the program order mode.
1) Alt Tab mode replicates the order that Windows' built-in task switcher displays programs.
2) Start Order mode displays the first program started in this Windows session in the first tile, the second in the second, and so on. The programs' positions remain the same throughout the current Windows session (i.e. until you shut down Program Picker and restart it, or turn off your PC). Some Windows programs may take the first position, this is a known bug. We recommend that you use Normal Mode for selecting programs to pin the Launcher Mode, and use Launcher Mode for all your launching and task switching.
To Pin Programs to Launcher Mode
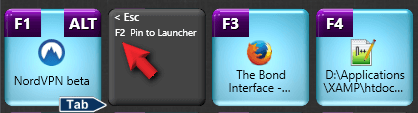
To pin programs to Launcher Mode tiles, first start the programs you wish to pin, using your usual method, then switch to Program Picker and make sure you are in Normal Mode (press the Spacebar to toggle between Normal Mode and Launcher Mode), then hold down the key (or the onscreen tile) of the program you want to pin; a popup menu will appear. Press the same key again to select 'Pin to Launcher'. In the example below, F2 is used.
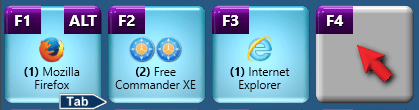
You will then be taken to the Launcher Mode screen. Now press the key of the tile you wish to pin the program to. In the example below, F4 is used.
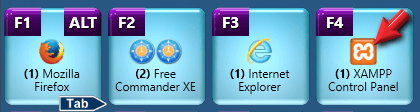
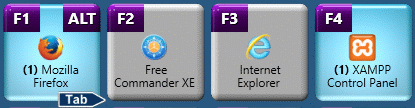
Press the Spacebar to return to Normal Mode, and repeat the previous operations with the other programs you want to pin to Launcher Mode. When finished, you will have pinned all your favourite programs to Launcher Mode, as shown below:
To Pin Files to Launcher Mode
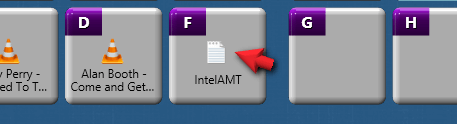
To pin a file to an empty tile in Launcher Mode, just press the key of the tile you want to pin a file to, then select the file from the 'Pin File to Launcher' window that opens. In the example below, we press 'F'.

The file is now pinned to the F key and can be launched from any program, simply by pressing the Program Picker launch key and then the F key.
To pin a file to an already occupied tile, hold down the key or tile and select 'Pin File' from the menu, then follow the instructions above. The previously pinned program/file will be unpinned automatically.
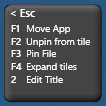
The popup menu also gives the following options:
1) Move App. Move the program to another tile.
2) Unpin from tile. Unpins the program/file from the tile, leaving it empty.
3) Expand tiles. (For programs only) If there are multiple instances of a program open, (for example, two Word documents), selecting this option will expand the instances across adjacent tiles to the right. See Expand Tiles for more details.
4) Edit Title. Edit the title on the tile - note: this does not rename the program or file on your system, only its name on the tile.
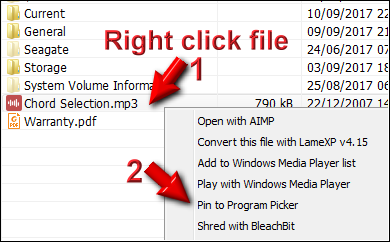
To Pin Programs using Windows Explorer
Right click any file in Windows Explorer (or any other file manager) and select 'Pin to Program Picker". You will then be taken to the Program Picker Launcher Mode screen, and can press the key of the tile you wish to pin the program to.
Expand Tiles
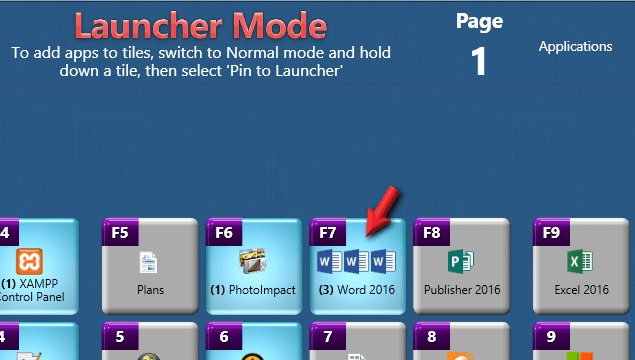
There are two ways to view multiple instances of a program. In the screenshot below, there are three documents open in Word.
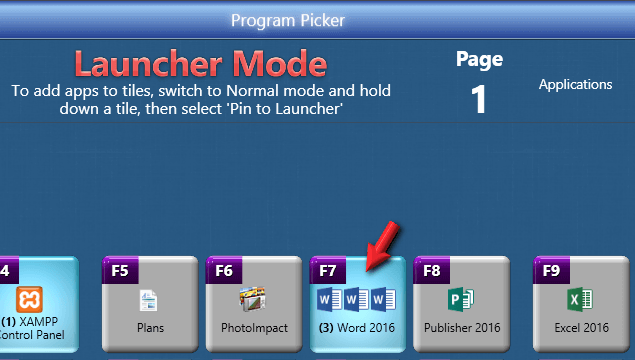
When F7 is pressed, the instances will temporarily expand across the adjacent tiles to the right:
The user then needs to press F7, F8 or F9 to access the required instance of Word. To avoid having to do this every time you access Program Picker, you can permanently expand multiple instances of any program across tiles to the right. Hold down the program's key to reveal the popup menu, then select 'Expand Tiles'.
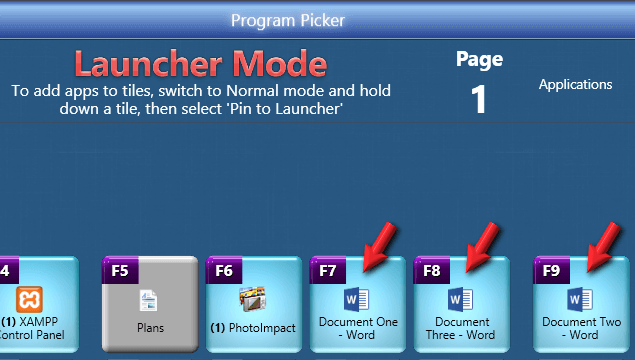
The subsequent instances will then be permanently expanded across the adjacent tiles, for as long as they are open. You can now access them with one key press instead of two.
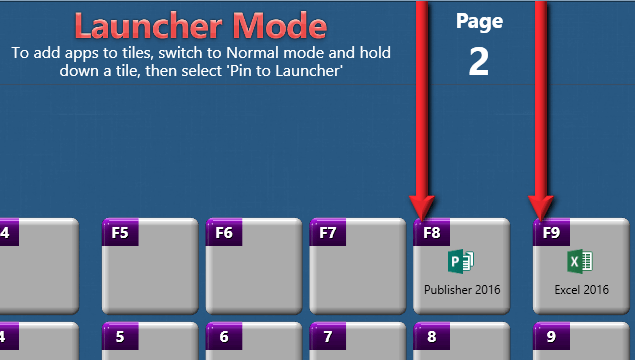
Previously occupied tiles to the right will be moved to the next page, and can be accessed from Program Picker by pressing F12 and then the original key. For example:
There are three documents open in Word.
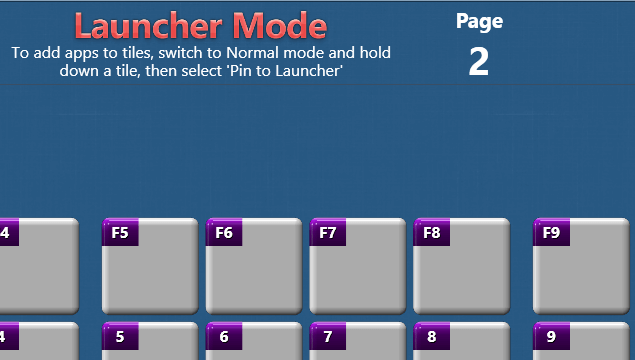
No programs or files are pinned to Page 2. (We recommend leaving Page 2 empty, otherwise programs/files that were pinned there will be temporarily moved to Page 3, if programs/files from Page 1 have been moved by expanding across tiles.)
The user selects 'Expand across tiles' and the second and third Word documents are permanently pinned (while they are open) to the F8 and F9 tiles.
Publisher 2016 and Excel 2016 are now temporarily moved to Page 2, on the same tiles as they were on Page 1, so they can be quickly accessed by pressing F12 when in Program Picker, and then their respective keys.
To avoid programs being moved to Page 2, as shown above, you may wish to leave two or three tiles empty to the right of any programs that you regularly use multiple instances of, to allow space for them to expand into.
Pages
Each page in Launcher Mode (when in Desktop Mode) contains 40 tiles. Press the F12 key to go forward one page, and the Esc key to go back one page. There are 200 pages of 40 tiles, giving 8,000 tiles in total. Each tile can hold a program or any file on your computer. Each page and tile can be given a title, or renamed.
Press the Launch Key you used to access Program Picker to view page numbers on the tiles, or press the "Show Page Numbers" tile at the top left. (You can press the Launch Key again to turn off Show Page Numbers.) The tile will glow blue when turned on. Then press the tile of the page you want to go to. Pages with programs or files pinned to their tiles will be highlighted in blue, empty pages are grey. Press F12 to move forwards through the blocks of 40 pages, and press Esc to go backwards.
For example: press ![]() to access Program Picker, then press
to access Program Picker, then press ![]() again to go into 'Show Page Numbers' mode - the tiles will now display page numbers instead of programs/files, as shown in the screenshot above. Press the tile of the page you want to go to.
again to go into 'Show Page Numbers' mode - the tiles will now display page numbers instead of programs/files, as shown in the screenshot above. Press the tile of the page you want to go to.
Rename pages
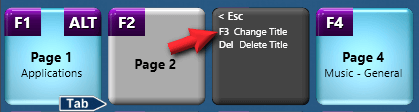
To rename a page, hold down the key of the page you want to rename, until the popup menu appears.
Press the key again to select 'Change Title'.
A title window appears. Change the title and press Enter. (If using a touchscreen, press the keyboard icon on the taskbar to display the onscreen keyboard, then use that to edit the title.)
The page has now been renamed.

You can use Program Picker's pages to store all sorts of information: for example, you could rename a page with a client's name, and store all the documents, pictures, etc. that you have on that client, on the same page. You can then quickly access any client's documents from any program by pressing just three keys. For example, to view documents on Page 8, just press:
![]()
![]()
![]()
When you pin a file to a tile, you are only pinning a link to the file, not the file itself, so if you have multiple files in different folders on your PC, you can bring them all together on one screen by pinning them to tiles on one page of Program Picker. You can easily make a playlist of music or video files, which are much easier to access using a touchscreen than by using the conventional Windows file windows, and also easier to access by using the keyboard on a desktop PC or laptop.
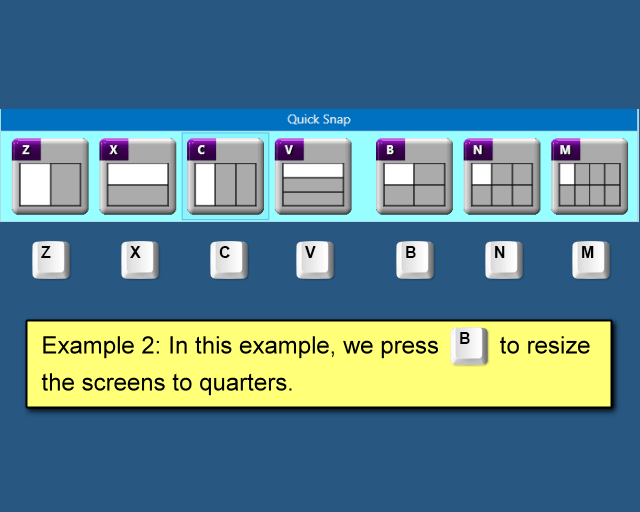
3) Quick Snap

Quick Snap allows you to quickly and easily resize program screens, using as few keys as possible, without using the mouse, without pressing simultaneous key combinations, and without having to remember keyboard shortcuts.
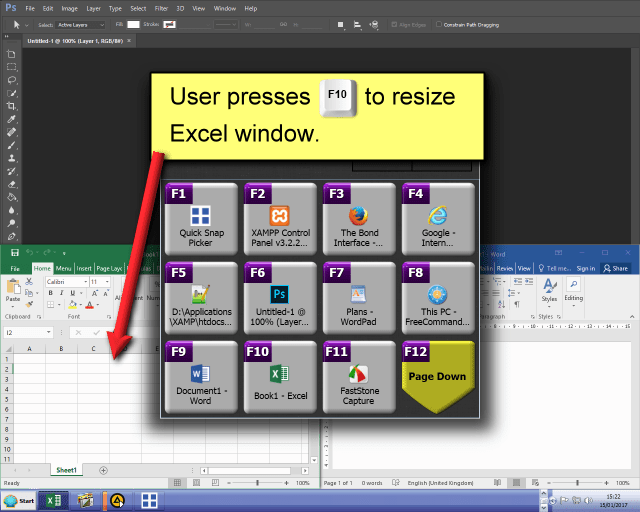
To access Quick Snap, go to Program Picker and press the letter key of the Quick Snap layout you want to use: Z, X, C, V, B, N, or M. (If using Tablet Mode, press F11 F11 to view the Tablet Mode Quick Snap screen.)
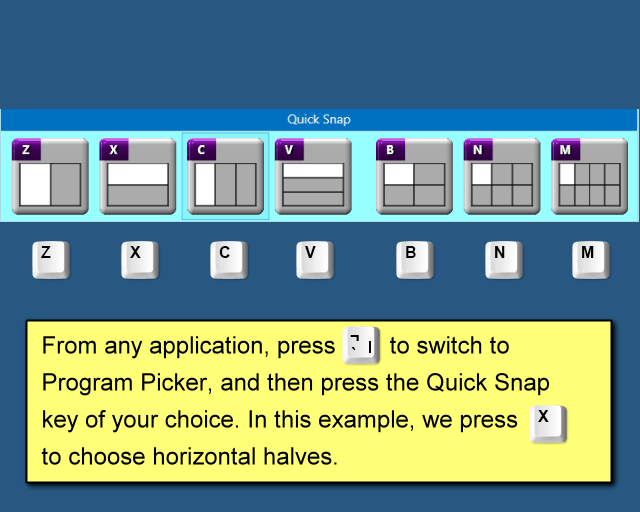
A Quick Snap window will appear, and the program you were in before accessing Program Picker will be resized underneath it.
Press the same key again to move the program to the next position (in a clockwise direction). When the program is in the desired position, press the function key of the next program you want to resize, or press Esc to finish. When you have finished resizing programs, press Esc to exit Quick Snap (and Program Picker). The program you were using before accessing Program Picker will be selected again.
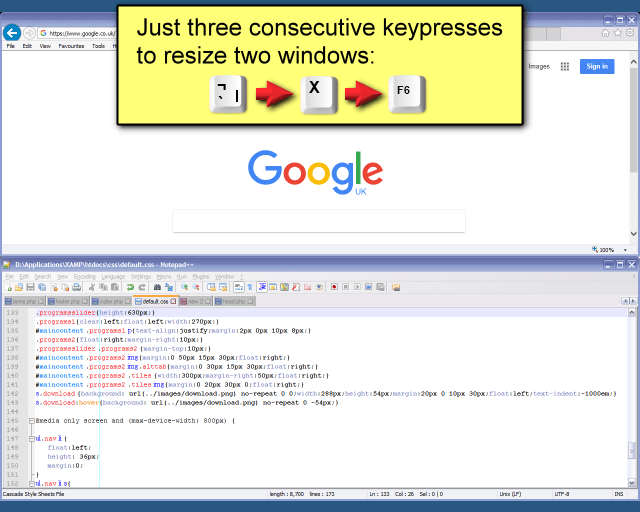
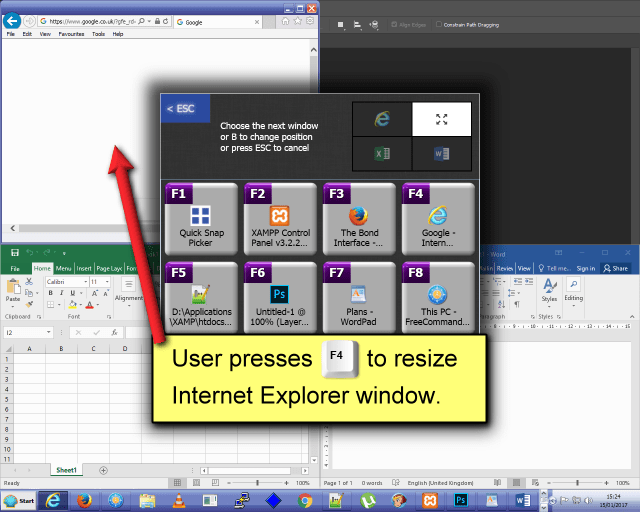
In the example below, the user was in Internet Explorer before accessing Program Picker, they pressed X to choose top/bottom halves in Quick Snap, Internet Explorer was immediately resized to the top half of the screen, behind the Quick Snap window. The user then pressed F6 to resize Notepad++ to the bottom half of the screen, as shown below.
Quarters. In this example we resize the screens to quarters by pressing the B key, and press the B key again to change the location of the program windows until they are in the desired position.
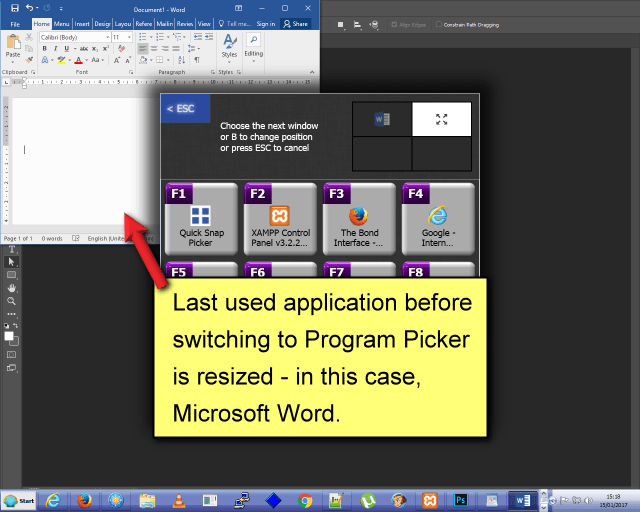
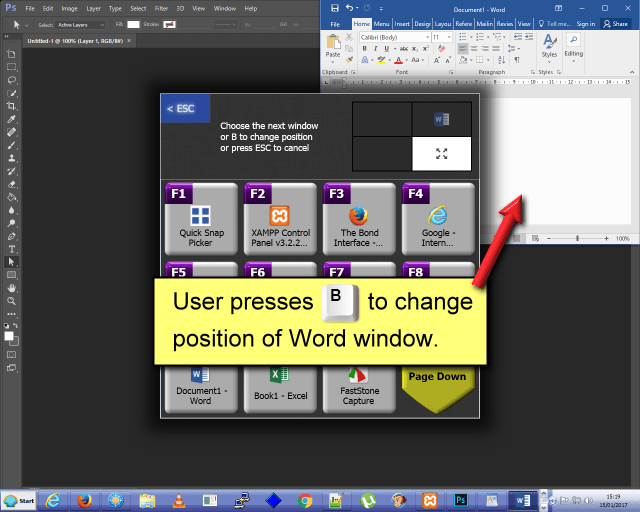
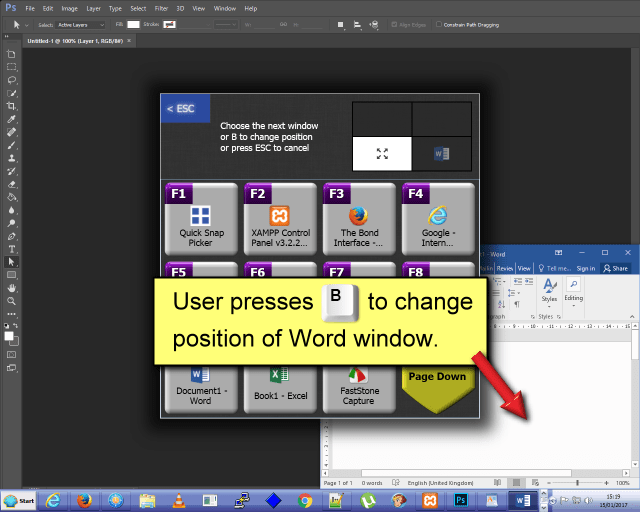
The Word window is now in the desired position, now the user presses the function key of the next program they want to resize, in this case F10. (If there are more than 11 programs running, press F12 to view the next page of 11 programs and select from there if necessary.)
The user then presses Esc to exit the Quick Snap window and return to the previous program, in this case Word.
Move to Monitor
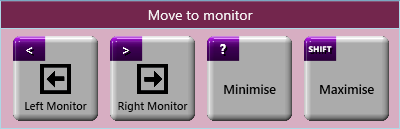
Switch to Program Picker and press the < key to move the previously selected program to the left monitor, press the > key to move it to the right monitor, press ? to minimise it, and press left or right Shift to maximise or restore it.
For example, to move any program to the right monitor, press ![]()
![]()
To maximise a program, press ![]()
![]()
Switcher Mode
Switcher Mode was designed to make copying and pasting between two (or more) programs as easy and quick as possible, using keyboard shortcuts.

Shut Down commands
Press the Backspace key to open the Shut Down window. Press the function key to activate the shut down command you require.

Backing Up Settings
You can save your Launcher Mode key layouts by saving the following files which are in:
C:\Users\YOURUSERNAME\AppData\Roaming\EFK\ProgramPicker
- where 'YOURUSERNAME' is your Windows user name folder in the C:\Users folder.
CommandLineParams.opt
LauncherItems.opt
LauncherItems2.opt
Pages.opt
settings.opt
If you then have to reinstall Program Picker (for example, when reinstalling Windows) then you can copy the saved versions of these .opt files over the newly installed versions.
Be aware that if you are going to reinstall programs listed in Launcher Mode after saving these .opt files, if you install any of the programs in a new location, Program Picker will no longer be able to find them and they will not appear in Launcher Mode after you copy the saved .opt files over the newly installed versions. I periodically take a screenshot of Launcher Mode so that I can at least see which keys I have installed which programs on, and then any that are missing I can manually start and then manually insert into Launcher Mode keys using Normal Mode.